Featured image of post HugoStack装修

HugoStack装修

我的hugo博客都做了哪些优化呢?

导语

博客就是拿来装修的,发文其实不重要(?

综述

我使用的是hugo stack博客,hugo博客有一个好处就是你可以将所有的更改放在博客根目录下,这会覆盖掉theme里对应的同名文件,同时很多主题(比如stack)支持以submodule的模式安装,所以就可以安心的更新主题,使用主题的最新特性了

这篇装修主要参考了以下大佬们的教程,あぃがとう❣以下排名不分先后

https://thirdshire.com/hugo-stack-renovation/

Hugo-theme-Stack 魔改美化 | Naive Koala (xalaok.top)

给博客添加heatmap | Liminal Negative Space

https://mogeko.me/zh-cn/posts/zh-cn/033/

具体操作

custom.scss

hugo的custom.scss是优先级最高的scss,其他所有的scss都会被他覆盖掉,这里我们通过修改css实现了

  • 各种棱角的磨圆,以及某些本来看着不够圆的磨得更圆
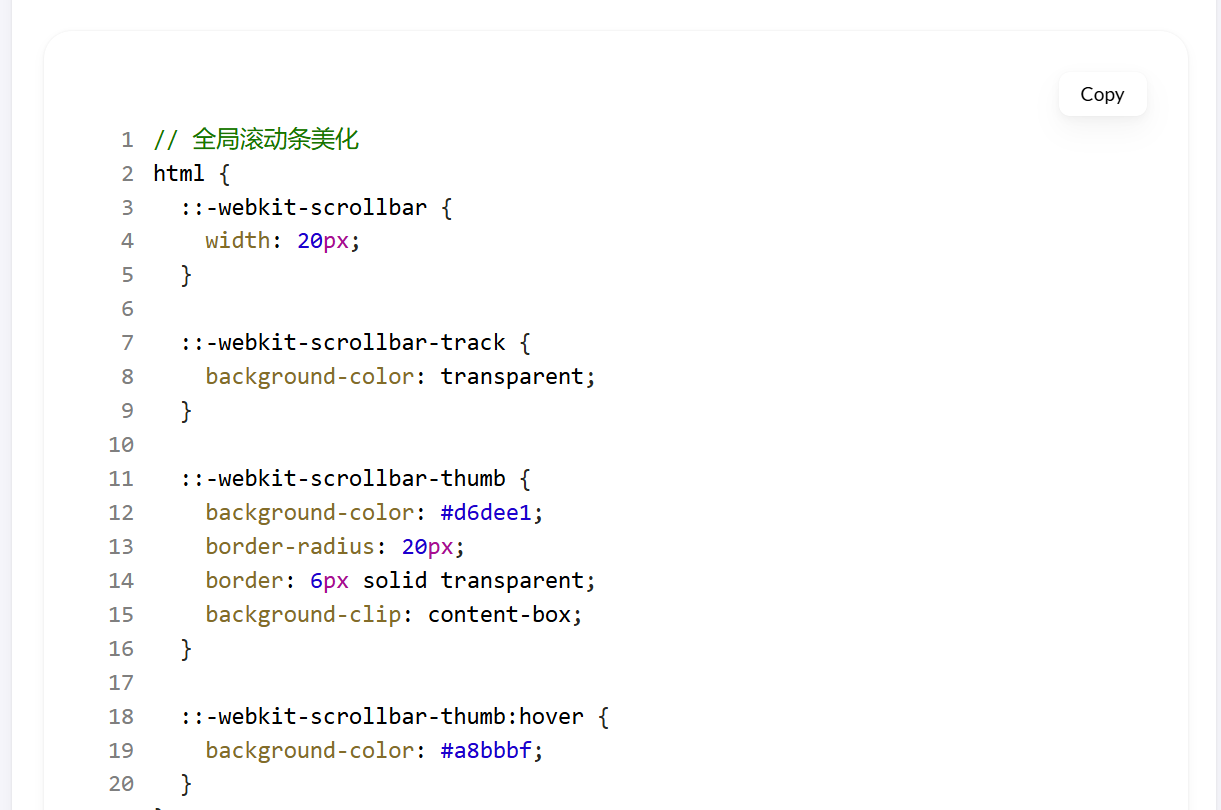
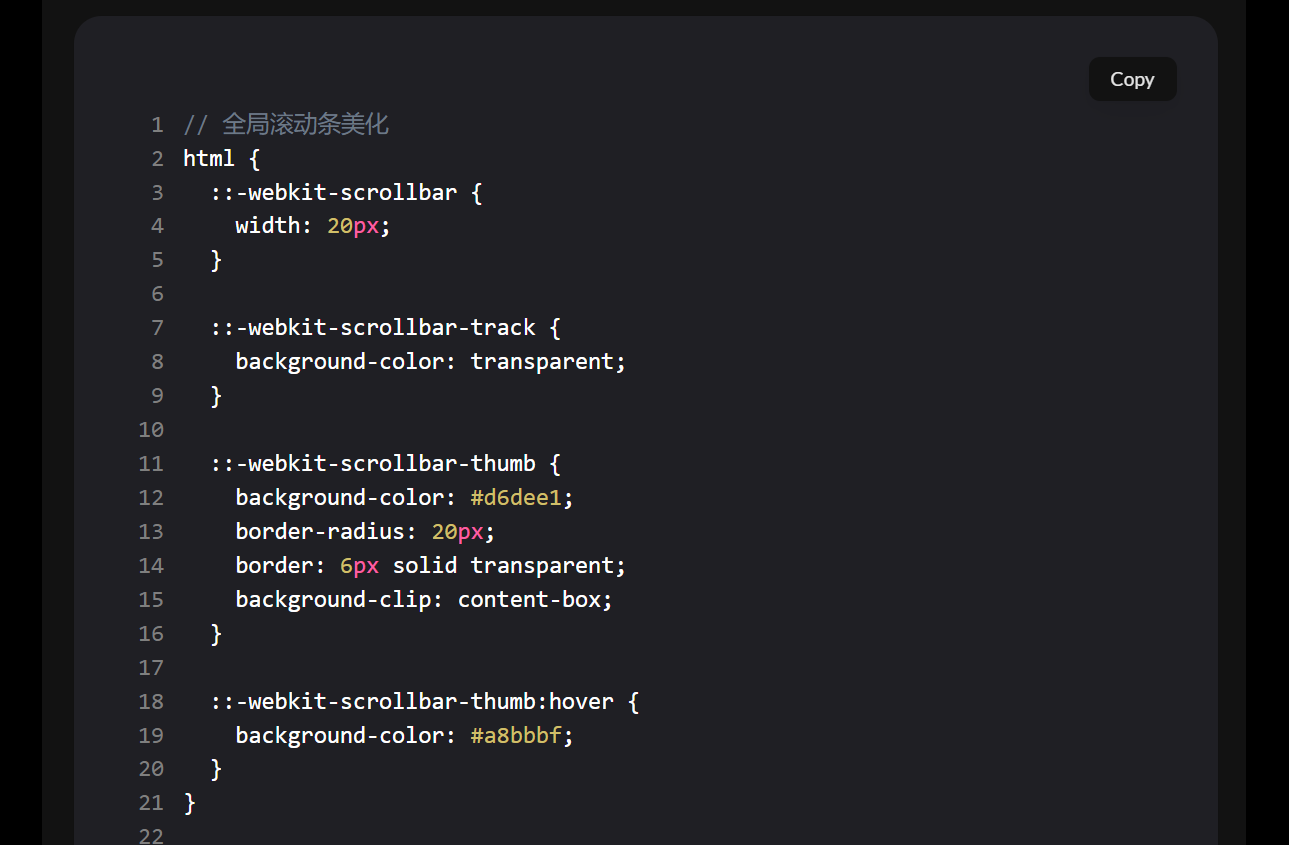
  • 滚动条的美化
  • light模式和dark模式的色彩修改(还没改完,这玩意你自己看着改就行,不知道改哪个变量可以去 \assets\scss\variables.scss
  • 修复引用块内容窄页面显示问题
  • 文章内容图片圆角阴影
  • 文章内容引用块样式
  • 代码块基础样式修改以及highlight主题变更(其实没啥用,而且还挺麻烦,有后续步骤,觉得麻烦也可以不改)
  • 设置选中字体的区域背景颜色
  • 文章封面高度更改
  • 全局页面布局间距调整
  • 页面三栏宽度调整
  • 全局页面小图片样式微调
  • 归档页面双栏
  • 链接三栏
  • 头像旋转动画

assets\scss\custom.scss里写

  1
  2
  3
  4
  5
  6
  7
  8
  9
 10
 11
 12
 13
 14
 15
 16
 17
 18
 19
 20
 21
 22
 23
 24
 25
 26
 27
 28
 29
 30
 31
 32
 33
 34
 35
 36
 37
 38
 39
 40
 41
 42
 43
 44
 45
 46
 47
 48
 49
 50
 51
 52
 53
 54
 55
 56
 57
 58
 59
 60
 61
 62
 63
 64
 65
 66
 67
 68
 69
 70
 71
 72
 73
 74
 75
 76
 77
 78
 79
 80
 81
 82
 83
 84
 85
 86
 87
 88
 89
 90
 91
 92
 93
 94
 95
 96
 97
 98
 99
100
101
102
103
104
105
106
107
108
109
110
111
112
113
114
115
116
117
118
119
120
121
122
123
124
125
126
127
128
129
130
131
132
133
134
135
136
137
138
139
140
141
142
143
144
145
146
147
148
149
150
151
152
153
154
155
156
157
158
159
160
161
162
163
164
165
166
167
168
169
170
171
172
173
174
175
176
177
178
179
180
181
182
183
184
185
186
187
188
189
190
191
192
193
194
195
196
197
198
199
200
201
202
203
204
205
206
207
208
209
210
211
212
213
214
215
216
217
218
219
220
221
222
223
224
225
226
227
228
229
230
231
232
233
234
235
236
237
238
239
240
241
242
243
244
245
246
247
248
249
250
251
252
253
254
255
256
257
258
259
260
261
262
263
264
265
266
267
268
269
270
271
272
273
274
275
276
277
278
279
280
281
282
283
284
285
286
287
288
289
290
291
292
293
294
295
296
297
298
299
300
301
302
303
304
305
306
307
308
309
310
311
312
313
314
315
316
317
318
319
320
321
322
323
324
325
326
327
328
329
330
331
332
333
334
335
336
337
338
339
340
// 全局滚动条美化
html {
  ::-webkit-scrollbar {
    width: 20px;
  }

  ::-webkit-scrollbar-track {
    background-color: transparent;
  }

  ::-webkit-scrollbar-thumb {
    background-color: #d6dee1;
    border-radius: 20px;
    border: 6px solid transparent;
    background-clip: content-box;
  }

  ::-webkit-scrollbar-thumb:hover {
    background-color: #a8bbbf;
  }
}

// 页面基本配色
:root {
  // 全局顶部边距
  --main-top-padding: 30px;
  // 全局卡片圆角
  --card-border-radius: 25px;
  // 标签云卡片圆角
  --tag-border-radius: 8px;
  // 卡片间距
  --section-separation: 40px;
  // 全局字体大小
  --article-font-size: 1.8rem;
  --emphasize-text-color: #9e8f9f; // Add emphasize font color
  // // 行内代码背景色
  // --code-background-color: #f8f8f8;
  // // 行内代码前景色
  // --code-text-color: #e96900;
  // 暗色模式下样式
  &[data-scheme="dark"] {
    // 背景色
    --body-background: #000000;
    // 滚动条按钮色
    --scrollbar-thumb: #24242480;
    // 文章卡片背景色
    --card-background: #121212;
    --emphasize-text-color: #d5cfc4; // Add emphasize font color for dark scheme
  }
}

//------------------------------------------------------
// 修复引用块内容窄页面显示问题
a {
  word-break: break-all;
}

code {
  word-break: break-all;
}

//---------------------------------------------------
// 文章内容图片圆角阴影
.article-page .main-article .article-content {
  img {
    max-width: 96% !important;
    height: auto !important;
    border-radius: 8px;
  }
}

//------------------------------------------------
// 文章内容引用块样式
.article-content {
  blockquote {
    border-left: 6px solid #358b9a1f !important;
    background: #3a97431f;
  }
}
// ---------------------------------------
// 代码块基础样式修改
.highlight {
  max-width: 102% !important;
  background-color: var(--pre-background-color);
  padding: var(--card-padding);
  position: relative;
  border-radius: 20px;
  margin-left: -7px !important;
  margin-right: -12px;
  box-shadow: var(--shadow-l1) !important;

  &:hover {
    .copyCodeButton {
      opacity: 1;
    }
  }

  // keep Codeblocks LTR
  [dir="rtl"] & {
    direction: ltr;
  }

  pre {
    margin: initial;
    padding: 0;
    margin: 0;
    width: auto;
  }
}

// light模式下的代码块样式调整
[data-scheme="light"] .article-content .highlight {
  background-color: #fff;
}

[data-scheme="light"] .chroma {
  // color: #ff6f00;
  background-color: #fff;
}

// dark模式下的代码块样式调整
[data-scheme="dark"] .article-content .highlight {
  background-color: #1f1f24;
}

[data-scheme="dark"] .chroma {
  // color: #ff6f00;
  background-color: #1f1f24;
}

//-------------------------------------------
// 设置选中字体的区域背景颜色
//修改选中颜色
::selection {
  color: #fff;
  background: #34495e;
}

a {
  text-decoration: none;
  color: var(--accent-color);

  &:hover {
    color: var(--accent-color-darker);
  }

  &.link {
    color: #4288b9ad;
    font-weight: 600;
    padding: 0 2px;
    text-decoration: none;
    cursor: pointer;

    &:hover {
      text-decoration: underline;
    }
  }
}

//-------------------------------------------------
//文章封面高度更改
.article-list article .article-image img {
  width: 100%;
  height: 150px;
  object-fit: cover;

  @include respond(md) {
    height: 200px;
  }

  @include respond(xl) {
    height: 305px;
  }
}

//---------------------------------------------------
// 全局页面布局间距调整
.main-container {
  min-height: 100vh;
  align-items: flex-start;
  padding: 0 15px;
  gap: var(--section-separation);
  padding-top: var(--main-top-padding);

  @include respond(md) {
    padding: 0 37px;
  }
}

//--------------------------------------------------
//页面三栏宽度调整
.container {
  margin-left: auto;
  margin-right: auto;

  .left-sidebar {
    order: -3;
    max-width: var(--left-sidebar-max-width);
  }

  .right-sidebar {
    order: -1;
    max-width: var(--right-sidebar-max-width);

    /// Display right sidebar when min-width: lg
    @include respond(lg) {
      display: flex;
    }
  }

  &.extended {
    @include respond(md) {
      max-width: 1024px;
      --left-sidebar-max-width: 25%;
      --right-sidebar-max-width: 22% !important;
    }

    @include respond(lg) {
      max-width: 1280px;
      --left-sidebar-max-width: 20%;
      --right-sidebar-max-width: 30%;
    }

    @include respond(xl) {
      max-width: 1453px; //1536px;
      --left-sidebar-max-width: 15%;
      --right-sidebar-max-width: 25%;
    }
  }

  &.compact {
    @include respond(md) {
      --left-sidebar-max-width: 25%;
      max-width: 768px;
    }

    @include respond(lg) {
      max-width: 1024px;
      --left-sidebar-max-width: 20%;
    }

    @include respond(xl) {
      max-width: 1280px;
    }
  }
}

//-------------------------------------------------------
//全局页面小图片样式微调
.article-list--compact article .article-image img {
  width: var(--image-size);
  height: var(--image-size);
  object-fit: cover;
  border-radius: 17%;
}

//------------------------------------------------
//将滚动条修改为圆角样式
//菜单滚动条美化
.menu::-webkit-scrollbar {
  display: none;
}


//--------------------------------------------------
//归档页面双栏
/* 归档页面两栏 */
@media (min-width: 1024px) {
  .article-list--compact {
    display: grid;
    grid-template-columns: 1fr 1fr;
    background: none;
    box-shadow: none;
    gap: 1rem;

    article {
      background: var(--card-background);
      border: none;
      box-shadow: var(--shadow-l2);
      margin-bottom: 8px;
      border-radius: 16px;
    }
  }
}

//--------------------------------------------------
//链接三栏
@media (min-width: 1024px) {
  .article-list--compact.links {
    display: grid;
    grid-template-columns: 1fr 1fr 1fr; //三个1fr即为三栏,两个1fr则为双栏,以此类推即可.
    background: none;
    box-shadow: none;
    gap: 1rem;

    article {
      background: var(--card-background);
      border: none;
      box-shadow: var(--shadow-l2);
      margin-bottom: 8px;
      border-radius: var(--card-border-radius);

      &:nth-child(odd) {
        margin-right: 8px;
      }
    }
  }
}

.article-list--tile article {
  transition: .6s ease;
}

.article-list--tile article:hover {
  transform: scale(1.03, 1.03);
}

.article-content {
  .highlight:before {
    content: '';
    display: block;
    background: url(/code-header.svg);
    height: 32px;
    width: 100%;
    background-size: 57px;
    background-repeat: no-repeat;
    margin-bottom: 5px;
    background-position: -1px 2px;
  }
}

// 头像旋转动画
.sidebar header .site-avatar .site-logo {
  transition: transform 1.65s ease-in-out; // 旋转时间
}

.sidebar header .site-avatar .site-logo:hover {
  transform: rotate(360deg); // 旋转角度为360度
}

设置不同的highlight

hugo使用的marker自带一个highlight的插件,但是只能全局适用,就是说light和dark都是一个highlight,stack自己设置了白天夜里两套highlight,在 assets\scss\partials\highlight

使用 hugo gen chromastyles --style=xcode-dark > syntax.css可以生成Chroma Style Gallery (xyproto.github.io)中对应的highlight的css,直接把对应的改成light.scss和dark.scss即可,然后再把common.scss的

 1
 2
 3
 4
 5
 6
 7
 8
 9
10
11
12
13
14
15
16
17
18
19
20
21
22
23
24
25
26
27
28
.chroma .lntd {
    vertical-align: top;
    padding: 0;
    margin: 0;
    border: 0;
}

/* LineTable */
.chroma .lntable {
    border-spacing: 0;
    padding: 0;
    margin: 0;
    border: 0;
    width: 100%;
    display: block;

    > tbody {
        display: block;
        width: 100%;
        > tr {
            display: flex;
            width: 100%;
            > td:last-child {
                overflow-x: auto;
            }
        }
    }
}

这一部分复制过来保存为scss。然后由于可能报看,还要在 custom.scss里应用这些调整来让代码块看着好看

 1
 2
 3
 4
 5
 6
 7
 8
 9
10
11
12
13
14
15
16
17
18
19
// light模式下的代码块样式调整
[data-scheme="light"] .article-content .highlight {
  background-color: #fff;
}

[data-scheme="light"] .chroma {
  // color: #ff6f00;
  background-color: #fff;
}

// dark模式下的代码块样式调整
[data-scheme="dark"] .article-content .highlight {
  background-color: #1f1f24;
}

[data-scheme="dark"] .chroma {
  // color: #ff6f00;
  background-color: #1f1f24;
}

我调的xcode的highlight大概长这样

1725461883340

1725461899323

只能说见仁见智了,我觉得其实不调也没啥,要再个性化的话可能就有点工作量太大了

字数统计

layouts/partials/footer/footer.html中增加

1
2
3
4
5
6
7
8
9
<!-- Add total page and word count time -->
<section class="totalcount">
    {{$scratch := newScratch}}
    {{ range (where .Site.Pages "Kind" "page" )}}
        {{$scratch.Add "total" .WordCount}}
    {{ end }}
    发表了{{ len (where .Site.RegularPages "Section" "post") }}篇文章 · 
    总计{{ div ($scratch.Get "total") 1000.0 | lang.FormatNumber 2 }}k字
</section>

注意如果你是用zh-cn ja ko语言,需要在config.yaml里设置 hasCJKLanguage:true,否则只会按照英文单词那样以空格分来统计

assets/scss/partials/footer.scss里增加

1
2
3
4
5
.totalcount {
    color: var(--card-text-color-secondary);
    font-weight: normal;
    margin-bottom: 5px;
    }

统计运行时间

layouts/partials/footer/custom.html里添加

 1
 2
 3
 4
 5
 6
 7
 8
 9
10
11
12
13
14
<!-- Add blog running time -->
<script>
    let s1 = '2023-3-18'; //website start date
    s1 = new Date(s1.replace(/-/g, "/"));
    let s2 = new Date();
    let timeDifference = s2.getTime() - s1.getTime();

    let days = Math.floor(timeDifference / (1000 * 60 * 60 * 24));
    let hours = Math.floor((timeDifference % (1000 * 60 * 60 * 24)) / (1000 * 60 * 60));
    let minutes = Math.floor((timeDifference % (1000 * 60 * 60)) / (1000 * 60));

    let result = days + "天" + hours + "小时" + minutes + "分钟";
    document.getElementById('runningdays').innerHTML = result;
</script>

然后再在 layouts/partials/footer/footer.html 里添加

1
2
3
4
5
<!-- Add blog running time -->
<section class="running-time">
本博客已稳定运行
<span id="runningdays" class="running-days"></span>
</section>

assets/scss/partials/footer.scss里添加

1
2
3
4
5
6
7
8
9
.running-time {
    color: var(--card-text-color-secondary);
    font-weight: normal;

    .running-days {
        font-weight:bold;
        color: var(--emphasize-text-color);
    }   
}

然后在variable.scss的 :root里加light和dark模式下的–emphasize-text-color的值

1
--emphasize-text-color: #9e8f9f; 

当然也可以在custom.scss里加,我在custom.scss里加了,你可以ctrl+F搜拿来参考。

自定义菜单

stack主题可以自定义菜单,他提供了两种方法,一种是在 config.yaml里添加

 1
 2
 3
 4
 5
 6
 7
 8
 9
10
11
12
13
14
15
16
17
18
19
20
21
22
23
24
25
menu:
#     main:
        # - name: 课程
        #   url: /post/class
        #   weight: 1
        #   params:
        #       icon: book-2

        # - name: 论文
        #   url: /post/thesis
        #   weight: 2
        #   params:
        #       icon: school

        # - name: 技术
        #   url: /post/tech
        #   weight: 3
        #   params:
        #       icon: device-desktop

        # - name: 杂项
        #   url: /post/misc
        #   weight: 4
        #   params:
        #       icon: topology-star-3

这样的设置,但是会出现选中的时候不高亮的问题,但是第二个可以高亮这个应该就可以高亮,只能说bug没修

第二种方式是在content/post里的_index.md的开头写,类似这样

 1
 2
 3
 4
 5
 6
 7
 8
 9
10
11
12
13
14
15
title:"👨🏻‍💻技术"

description:"一些我感兴趣的学科相关的技术"

menu:

  main:

    name:"技术"

    weight:3

    params:

      icon:device-desktop

这里icon要放在 assets\icons下,我建议在https://tabler-icons.io/里找对于的svg,这样整体风格是一致的

heatmap

layouts\shortcodes\layouts\partials里添加一个heatmap.html

  1
  2
  3
  4
  5
  6
  7
  8
  9
 10
 11
 12
 13
 14
 15
 16
 17
 18
 19
 20
 21
 22
 23
 24
 25
 26
 27
 28
 29
 30
 31
 32
 33
 34
 35
 36
 37
 38
 39
 40
 41
 42
 43
 44
 45
 46
 47
 48
 49
 50
 51
 52
 53
 54
 55
 56
 57
 58
 59
 60
 61
 62
 63
 64
 65
 66
 67
 68
 69
 70
 71
 72
 73
 74
 75
 76
 77
 78
 79
 80
 81
 82
 83
 84
 85
 86
 87
 88
 89
 90
 91
 92
 93
 94
 95
 96
 97
 98
 99
100
101
102
103
104
105
106
107
108
109
110
111
112
113
114
115
116
117
118
119
120
121
122
123
124
125
126
127
128
129
130
131
132
133
134
135
136
137
138
139
140
141
142
143
144
145
146
147
148
149
150
151
152
153
154
155
156
157
158
159
160
161
162
163
164
165
<div id="heatmap" style="
  max-width: 1900px;
  height: 180px;
  padding: 2px;
  text-align: center;
  "
></div>
<script src="https://cdn.jsdelivr.net/npm/echarts@5.3.0/dist/echarts.min.js"></script>
<script type="text/javascript">
  var chartDom = document.getElementById('heatmap');
  var myChart = echarts.init(chartDom);
  window.onresize = function() {
      myChart.resize();
  };
  var option;

  // echart heatmap data seems to only support two elements tuple
  // it doesn't render when each item has 3 value
  // it also only pass first 2 elements when reading event param
  // so here we build a map to store additional metadata like link and title
  // map format {date: [{wordcount, link, title}]}
  // for more information see https://blog.douchi.space/hugo-blog-heatmap
  var dataMap = new Map();
  {{ range ((where .Site.RegularPages "Type" "post")) }}
    var key = {{ .Date.Format "2006-01-02" }};
    var value = dataMap.get(key);
    var wordCount = {{ .WordCount }};
    var link = {{ .RelPermalink}};
    var title = {{ .Title }};
  
    // multiple posts in same day
    if (value == null) {
      dataMap.set(key, [{wordCount, link, title}]);
    } else {
      value.push({wordCount, link, title});
    }
  {{- end -}}

  var data = [];
  // sum up the word count
  for (const [key, value] of dataMap.entries()) {
    var sum = 0;
    for (const v of value) {
      sum += v.wordCount;
    }
    data.push([key, (sum / 1000).toFixed(1)]);
  }
  
  var startDate = new Date();
  var year_Mill = startDate.setFullYear((startDate.getFullYear() - 1));
  var startDate = +new Date(year_Mill);
  var endDate = +new Date();

  var dayTime = 3600 * 24 * 1000;
  startDate = echarts.format.formatTime('yyyy-MM-dd', startDate);
  endDate = echarts.format.formatTime('yyyy-MM-dd', endDate);

  // change date range according to months we want to render
  function heatmap_width(months){         
    var startDate = new Date();
    var mill = startDate.setMonth((startDate.getMonth() - months));
    var endDate = +new Date();
    startDate = +new Date(mill);

    endDate = echarts.format.formatTime('yyyy-MM-dd', endDate);
    startDate = echarts.format.formatTime('yyyy-MM-dd', startDate);

    var showmonth = [];
    showmonth.push([
        startDate,
        endDate
    ]);
    return showmonth
  };

  function getRangeArr() {
    const windowWidth = window.innerWidth;
    if (windowWidth >= 600) {
      return heatmap_width(12);
    } else if (windowWidth >= 400) {
      return heatmap_width(9);
    } else {
      return heatmap_width(6);
    }
  }

  option = {
    title: {
        top: 0,
        left: 'center',
        text: '博客热力图'
    },
    tooltip: {
      hideDelay: 1000,
      enterable: true,
      formatter: function (p) {
        const date = p.data[0];
        const posts = dataMap.get(date);
        var content = `${date}`;
        for (const [i, post] of posts.entries()) {
            content += "<br>";
            var link = post.link;
            var title = post.title;
            var wordCount = (post.wordCount / 1000).toFixed(1);
            content += `<a href="${link}" target="_blank">${title} | ${wordCount} k</a>`
        }
        return content;
      }
    },
    visualMap: {
        min: 0,
        max: 10,
        type: 'piecewise',
        orient: 'horizontal',
        left: 'center',
        top: 30,
    
        inRange: {   
          //  [floor color, ceiling color]
          color: ['#7aa8744c', '#7AA874' ] 
        },
        splitNumber: 4,
        text: ['千字', ''],
        showLabel: true,
        itemGap: 20,
    },
    calendar: {
        top: 80,
        left: 20,
        right: 4,
        cellSize: ['auto', 13],
        range: getRangeArr(),
        itemStyle: {
            color: '#F1F1F1',
            borderWidth: 1.5,
            borderColor: '#fff',
        },
        yearLabel: { show: false },
        // the splitline between months. set to transparent for now.
        splitLine: {
          lineStyle: {
            color: 'rgba(0, 0, 0, 0.0)',
            // shadowColor: 'rgba(0, 0, 0, 0.5)',
            // shadowBlur: 5,
            // width: 0.5,
            // type: 'dashed',
          }
        }
    },
    series: {
        type: 'heatmap',
        coordinateSystem: 'calendar',
        data: data,
    }
  };
  myChart.setOption(option);
  myChart.on('click', function(params) {
    if (params.componentType === 'series') {
      // open the first post on the day
      const post = dataMap.get(params.data[0])[0];
      const link = window.location.origin + post.link;
      window.open(link, '_blank').focus();
    }
});
</script> 

如果在html模板中使用,就在要用的位置写 {{ partial "heatmap" . }}

如果在Markdown里用,在要用的位置写

1
{{/* heatmap */}}

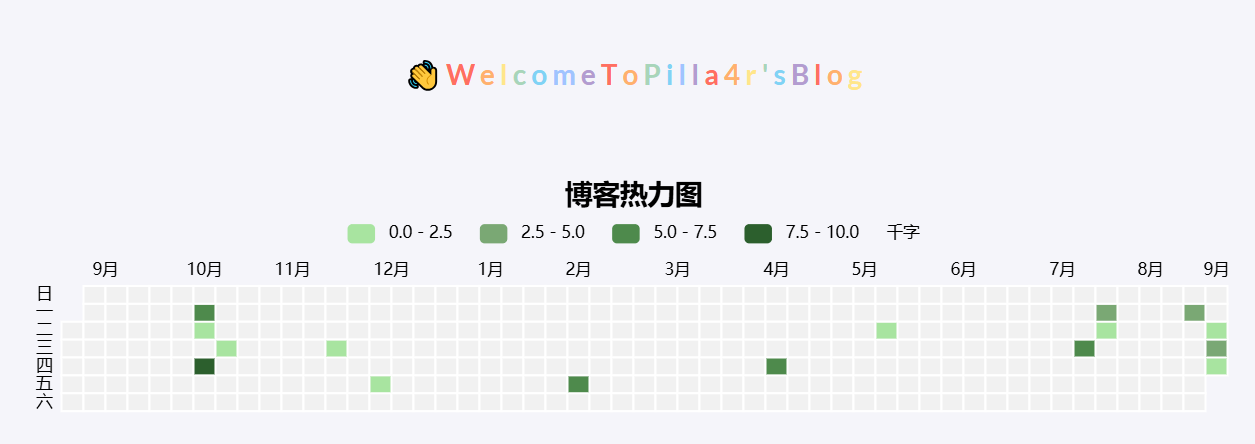
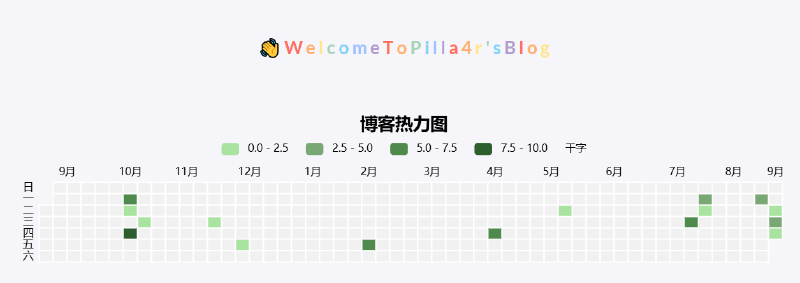
大概长这样

1725472639010

好像对暗色模式的适配不是很好,之后看看怎么改毕比较合理。

更新:优化完毕~

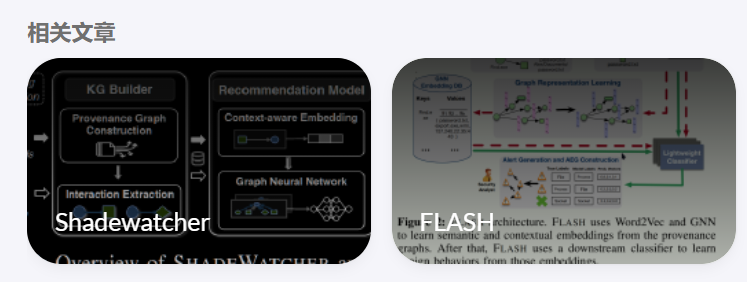
取消相关推荐的图片的奇怪的彩色阴影

\assets\ts\main.ts的第9行

1
	// import { getColor } from 'ts/color';

和33到59行

 1
 2
 3
 4
 5
 6
 7
 8
 9
10
11
12
13
14
15
16
17
18
19
20
21
22
23
24
25
26
27
 	// const articleTile = document.querySelector('.article-list--tile');
        // if (articleTile) {
        //     let observer = new IntersectionObserver(async (entries, observer) => {
        //         entries.forEach(entry => {
        //             if (!entry.isIntersecting) return;
        //             observer.unobserve(entry.target);

        //             const articles = entry.target.querySelectorAll('article.has-image');
        //             articles.forEach(async articles => {
        //                 const image = articles.querySelector('img'),
        //                     imageURL = image.src,
        //                     key = image.getAttribute('data-key'),
        //                     hash = image.getAttribute('data-hash'),
        //                     articleDetails: HTMLDivElement = articles.querySelector('.article-details');

        //                 const colors = await getColor(key, hash, imageURL);

        //                 articleDetails.style.background = `
        //                 linear-gradient(0deg, 
        //                     rgba(${colors.DarkMuted.rgb[0]}, ${colors.DarkMuted.rgb[1]}, ${colors.DarkMuted.rgb[2]}, 0.5) 0%, 
        //                     rgba(${colors.Vibrant.rgb[0]}, ${colors.Vibrant.rgb[1]}, ${colors.Vibrant.rgb[2]}, 0.75) 100%)`;
        //             })
        //         })
        //     });

        //     observer.observe(articleTile)
        // }

注释掉

会从这样

1725459865691

变成这样

1725459811880

Licensed under CC BY-NC-SA 4.0
使用 Hugo 构建
主题 StackJimmy 设计
发表了19篇文章 · 总计98.45k字
已经向互联网拉屎了